Best Animation Tools for HTML Canvas Curve Lines to Buy in November 2025
LitEnergy A4 LED Copy Board Light Tracing Box, Ultra-Thin Adjustable USB Power Artcraft LED Trace Light Pad for Tattoo Transferring, Drawing, Streaming, Sketching, Animation, Stenciling
-
ULTRA-LIGHT AND SLIM DESIGN FOR EASY PORTABILITY ANYWHERE YOU GO.
-
ADJUSTABLE BRIGHTNESS FOR ULTIMATE CONTROL OVER YOUR CREATIVE PROJECTS.
-
FLICKER-FREE LED ENSURES A COMFORTABLE, EYE-FRIENDLY WORKING SURFACE.


Digital Drawing Glove 2 Pack,Artist Glove for Drawing Tablet,ipad,Sketching,Art Glove with Two Finger for Right Hand and Left Hand (Smudge Guard, Medium,3.15x8.58inch
- FIXED DESIGN: ENHANCED COMFORT AND PALM PROTECTION WHILE CREATING.
- VERSATILE USE: IDEAL FOR DRAWING, TRACING, AND DIGITAL ART APPLICATIONS.
- SMOOTH MOVEMENT: REDUCES FRICTION FOR SEAMLESS TABLET INTERACTIONS.

PRIMBEEKS Premium Blank Flip Book Paper, 4 pack(90 sheets, 180 pages per pack) No Bleed Flip Books Kit, 4.5" x 2.5" Animation Paper for Animation, Sketching, Cartoon Creation
-
UNLEASH CREATIVITY: DRAW ANY ANIMATION WITH OUR PREMIUM FLIP BOOKS!
-
VERSATILE USE: COMPATIBLE WITH PENCILS, MARKERS, AND MORE-NO BLEED!
-
PERFECTLY PORTABLE: FOUR 90-SHEET BOOKS IDEAL FOR KIDS AND ADULTS!
Light Box Drawing Pad, Tracing Board with Type-C Charge Cable and Brightness Adjustable for Artists, AnimationDrawing, Sketching, Animation, X-ray Viewing (A4) Not Rechargeable
-
ADJUSTABLE BRIGHTNESS: FEATURES 3 MODES FOR CUSTOMIZABLE LIGHTING.
-
HIGH-QUALITY PMMA: TRANSPARENT, DURABLE, AND SAFE FOR ARTWORK.
-
PORTABLE DESIGN: SUPER THIN AND LIGHTWEIGHT FOR EASY TRANSPORT.
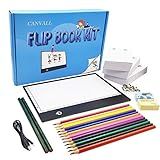
Canvall Flipbook Set for Drawing and Tracing Animation, Include: A5 LED Light Box, 540 Pages Animated Loose-Leaf Paper, 2 HB +12 Colored Drawing Pencils, Pencil Sharpener, Eraser and Screwdriver
-
ALL-IN-ONE KIT: INCLUDES EVERYTHING ARTISTS NEED TO CREATE AMAZING ANIMATIONS!
-
PORTABLE LIGHT PAD: ULTRA-THIN, FLICKER-FREE DESIGN FOR COMFORTABLE, LONG HOURS OF USE.
-
VERSATILE PAPER & TOOLS: 540 PRE-DRILLED PAGES FOR LIMITLESS CREATIVITY AND PROJECTS!
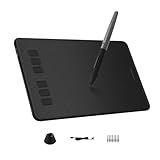
HUION Inspiroy H640P Drawing Tablet, 6x4 inch Digital Art with Battery-Free Stylus, 8192 Pen Pressure, 6 Hot Keys, Graphics Tablet for Drawing, Writing, Design, Teaching, Work with Mac, PC & Mobile
-
CUSTOM SHORTCUTS: 6 CUSTOMIZABLE KEYS STREAMLINE YOUR WORKFLOW EFFICIENTLY.
-
NATURAL DRAWING EXPERIENCE: BATTERY-FREE PEN OFFERS 8192 LEVELS OF PRESSURE SENSITIVITY.
-
LIGHTWEIGHT & PORTABLE: ULTRA-THIN DESIGN FOR EASY ON-THE-GO CREATIVITY.
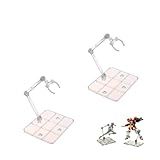
TSY TOOL 2 Pcs of HG144 Action Figure Stand, Display Holder Base, Doll Model Support Stand Compatible with 6" HG RG SD SHF Gundam 1/44 Toy Clear
- QUICK ASSEMBLY: NO TOOLS NEEDED; EASY PRESS-FIT DESIGN SAVES TIME!
- STURDY SUPPORT: DURABLE PLASTIC SECURELY HOLDS YOUR ACTION FIGURES.
- UNIVERSAL FIT: COMPATIBLE WITH VARIOUS 6-8 INCH ACTION FIGURE LINES.
To animate HTML canvas curve lines, you can use JavaScript and the canvas element. Here is an overview of the steps involved:
- Create a canvas element in your HTML markup:
- In your JavaScript code, retrieve the canvas element and get its 2D rendering context: const canvas = document.getElementById('canvas'); const ctx = canvas.getContext('2d');
- Define the properties of the curve line, such as its starting point, control points, and ending point. For example: const startX = 50; const startY = 50; const controlX1 = 100; const controlY1 = 150; const controlX2 = 200; const controlY2 = 150; const endX = 250; const endY = 50;
- Create a function that draws the curve line on the canvas: function drawCurveLine() { ctx.beginPath(); ctx.moveTo(startX, startY); ctx.bezierCurveTo(controlX1, controlY1, controlX2, controlY2, endX, endY); ctx.stroke(); }
- To animate the curve line, you need to redraw it multiple times at different stages of animation. You can achieve this using the requestAnimationFrame function. Create a function that updates the properties of the curve line and calls the drawing function in each frame of the animation: let animationProgress = 0; const animationSpeed = 0.01; function animateCurveLine() { // Update the properties of the curve line based on the animation progress controlX1 += 1; controlX2 -= 1; animationProgress += animationSpeed; // Clear the canvas before drawing the curve line at each frame ctx.clearRect(0, 0, canvas.width, canvas.height); // Draw the curve line using the updated properties drawCurveLine(); // Call the animation function again for the next frame requestAnimationFrame(animateCurveLine); }
- Finally, call the animation function to start animating the curve line: animateCurveLine();
By adjusting the properties of the curve line and the animation function, you can create various effects and styles for your animated HTML canvas curve lines.
What is HTML canvas and how can it be used for animation?
HTML canvas is an HTML element that allows for dynamic, interactive rendering of graphics and animations in a web page. It provides a rectangular drawing area on the web page, where developers can use JavaScript to draw different shapes, images, text, and apply various transformations.
To use HTML canvas for animation, developers can take advantage of the canvas API in JavaScript. The canvas API provides several methods and properties that enable creating smooth animations. Here are the basic steps to create animation on an HTML canvas:
- Create a canvas element in the HTML markup with a defined width and height:
- Get a reference to the canvas element in JavaScript:
const canvas = document.getElementById('myCanvas'); const ctx = canvas.getContext('2d');
- Use the requestAnimationFrame method to create a loop that updates and renders frames of the animation continuously:
function animate() { // Clear the canvas ctx.clearRect(0, 0, canvas.width, canvas.height);
// Update animation logic
// Draw objects in the updated state
// Request the next frame requestAnimationFrame(animate); }
// Start the animation loop animate();
Inside the animate function, developers can update the animation logic, such as moving objects, changing their positions, colors, etc. They can then draw the updated state of objects using the canvas rendering context (ctx) by calling various canvas API methods, such as fillRect(), drawImage(), fillText(), etc. They can also apply transformations like scaling, rotating, and translating to create complex animations.
By continuously updating the animation logic and re-rendering frames through the requestAnimationFrame method, developers can achieve smooth and interactive animations on an HTML canvas.
What is the difference between quadratic curve and bezier curve in HTML canvas?
In HTML canvas, a quadratic curve is a curve that is defined by a start point, an end point, and a control point. It is also known as a second-degree Bézier curve. The shape of the curve is controlled by the position of the control point.
On the other hand, a Bézier curve in HTML canvas is a more generalized curve that is defined by multiple control points. A cubic Bézier curve, for example, is defined by two control points in addition to the start and end points. The position of the control points determines the shape of the curve.
In summary, the main difference between a quadratic curve and a Bézier curve in HTML canvas is that a quadratic curve has only one control point, while a Bézier curve can have multiple control points.
How to animate a curve line in HTML canvas using requestAnimationFrame()?
To animate a curve line in HTML canvas using requestAnimationFrame(), you would need to follow these steps:
- Set up the HTML canvas element in your HTML file:
- Access the canvas element in JavaScript by using the getElementById() method:
const canvas = document.getElementById("myCanvas"); const ctx = canvas.getContext("2d");
- Set the initial values for your curve line:
let x = 0; // X-coordinate of the curve start point let y = canvas.height / 2; // Y-coordinate of the curve start point let curveWidth = 300; // Width of the curve let curveHeight = 100; // Height of the curve
- Define a function to draw the curve line using the provided coordinates:
function drawCurveLine() { ctx.clearRect(0, 0, canvas.width, canvas.height);
ctx.beginPath(); ctx.moveTo(x, y); ctx.bezierCurveTo(x + curveWidth / 2, y - curveHeight / 2, x + curveWidth / 2, y + curveHeight / 2, x + curveWidth, y); ctx.stroke();
x++;
requestAnimationFrame(drawCurveLine); }
- Call the drawCurveLine() function to start the animation:
drawCurveLine();
In this example, the drawCurveLine() function is repeatedly called using requestAnimationFrame(), which creates a smooth animation effect. The x-coordinate of the start point is incremented in each frame, so the curve line is progressively drawn on the canvas.
Remember to adjust the values of curveWidth and curveHeight to meet your desired animation requirements. You can further customize the curve line by modifying the curveTo() method's control points.
Note: Don't forget to add CSS styles to your canvas element to set its width and height, so it becomes visible on the page.
What are the different curve line properties in HTML canvas that can be animated?
There are several curve line properties in HTML canvas that can be animated. Some of the most commonly used ones include:
- Line color (strokeStyle): This property defines the color of the curve line.
- Line width (lineWidth): It determines the thickness of the curve line.
- Line dash (setLineDash): This property creates a dashed line effect by specifying the lengths of alternating dashes and gaps.
- Line cap (lineCap): It determines the shape of the ends of the curve line. The possible values are "butt" (default), "round", and "square".
- Line join (lineJoin): This property defines how two connecting segments of the curve line are joined together. The possible values are "round", "bevel", and "miter" (default).
- Line miter (miterLimit): It specifies a limit on the miter length while using the "miter" line join. It is only applicable when the lineJoin property is set to "miter".
These properties can be animated by changing their values over time using JavaScript and HTML canvas animation techniques such as requestAnimationFrame or CSS animations.
How to create dashed animation effects for curve lines in HTML canvas?
To create dashed animation effects for curve lines in HTML canvas, you can use the setLineDash method along with the lineDashOffset property. Here's an example of how you can achieve it:
- Create an HTML canvas element:
- Define the CSS styles for the canvas:
#myCanvas { background-color: #f1f1f1; }
- Create a JavaScript function to draw the dashed animation on the canvas:
function draw() { const canvas = document.getElementById("myCanvas"); const ctx = canvas.getContext("2d"); const dashLen = 8; // Length of each dash let dashOffset = dashLen; const speed = 1; // Animation speed (increase for faster animation)
// Set the line dash pattern ctx.setLineDash([dashLen, dashLen]);
// Draw the dashed line function animate() { ctx.clearRect(0, 0, canvas.width, canvas.height); ctx.beginPath(); ctx.moveTo(0, canvas.height / 2);
dashOffset -= speed;
ctx.lineDashOffset = dashOffset;

ctx.lineTo(canvas.width, canvas.height / 2);
ctx.stroke();

if (dashOffset <= 0) {
  dashOffset = dashLen;
}

requestAnimationFrame(animate);
}
animate(); }
- Finally, call the draw function once the document is loaded:
document.addEventListener("DOMContentLoaded", draw);
This example creates a dashed animation effect for a horizontal line in the center of the canvas. Adjust the line's starting and ending points as needed for your curve lines.