Best Tools for Image Conversion to Buy in November 2025

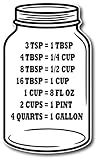
Kitchen Measurement Conversion Chart Magnet - Extra Large Easy to Read Magnetic Kitchen Decor - Weight, Liquid, Temperature Recipe Measuring Tool - Cooking, Cookbook & Baking Accessories Fridge Magnet
- EXTRA LARGE & EASY TO READ: CLEAR MEASUREMENTS AT A GLANCE!
- COMPREHENSIVE CONVERSIONS: ALL ESSENTIAL MEASUREMENTS IN ONE PLACE!
- PERFECT BAKING GIFT: DELIGHT CHEFS WITH THIS MUST-HAVE KITCHEN TOOL!


Yesimla USB C Adapter Cable Kit, Multi Charging Cable Case Convertor USB C to iOS Device/Type C/Micro/USB A Adapter, Data Transfer Contains Card Slot for Traveling, Use as Phone Holder (Black)
-
ALL-IN-ONE SOLUTION: NO MORE TANGLED CABLES; CHARGE & SYNC EASILY!
-
DURABLE DESIGN: SCRATCH-RESISTANT ALLOY ENHANCES SPEED & LONGEVITY.
-
COMPACT PORTABILITY: FITS IN POCKETS; PERFECT FOR TRAVEL & ON-THE-GO USE!
GDMINLO Soft Tape Measure Double Scale Body Sewing Flexible Tailor Craft Vinyl Ruler for Weight Loss Medical Body Measurement, Has Centimetre Scale on Reverse Side 60-inch(White)
- DOUBLE-SIDED MEASUREMENT FOR PRECISION: INCHES & CENTIMETERS AVAILABLE.
- DURABLE, STRETCH-RESISTANT MATERIAL ENSURES CONSISTENT ACCURACY EVERY TIME.
- USER-FRIENDLY DESIGN WITH LARGE MARKINGS FOR EASY READING AND OPERATION.
HP FilmScan Touch Screen Film & Slide Scanner Digitizer with 5” LCD Screen, Quickly Convert Negatives & Slides to Digital 22MP JPEG Photos, Compatible with 135, 126 and 110 Film & Slides
-
EASILY CONVERT AND SAVE YOUR MEMORIES-JUST ONE TOUCH!
-
ENJOY A VIBRANT 5” TOUCH SCREEN FOR SEAMLESS PREVIEWING AND EDITING.
-
EFFORTLESS FILM LOADING AND INTEGRATED EDITING FOR STUNNING RESULTS!
Kitchen Conversion Chart on Jar Magnet Standard Conversion Chart Décor Cooking Measurements for Food Measuring Easy to Read Recipe Baking Tools Accessories
-
EXTRA STRONG MAGNET ENSURES STABILITY ON ANY SURFACE FOR QUICK ACCESS.
-
LARGE, EASY-TO-READ DESIGN SIMPLIFIES COOKING AND BAKING MEASUREMENTS.
-
IDEAL GIFT OPTION FOR CHEFS AND BAKERS, ENHANCING KITCHEN EFFICIENCY!
Weltool Glass Lens for Maglite Flashlight Lens Upgrade Compatible Mini Maglite PRO LED Flashlight (AA Model) (1pc)
- SCRATCH-RESISTANT GLASS ENSURES LASTING CLARITY AND DURABILITY.
- PERFECT 22MM DIAMETER FITS ALL AA MINI MAGLITE MODELS SEAMLESSLY.
- EASY FOCUS ADJUSTMENT MAINTAINS OPTIMAL BEAM PERFORMANCE.
To convert an image to a tensor in Golang, you would need to follow several steps:
- Load the image file: Use the appropriate package in Golang, such as the os package, to open and read the image file from the disk.
- Decode the image: Utilize the suitable image decoding library, such as the image package in Golang, to decode the image file data into an image.Image object.
- Convert to a tensor: Create a new tensor object with the required dimensions to hold the image data. The dimensions will depend on the format and size of the image.
- Iterate through image pixels: Loop through each pixel of the decoded image and extract its color information. Use the appropriate methods provided by the image package, such as At(x, y) to access pixel values.
- Convert pixel data to tensor format: Depending on the specific requirements or the machine learning framework being used, you may need to preprocess the pixel data before conversion. This could involve scaling, normalizing, or converting color representations. Ensure that the data is in a format that can be stored in the tensor.
- Store pixel data in the tensor: Assign each pixel's processed data to the corresponding location in the tensor object.
By following these steps, you can successfully convert an image to a tensor in Golang for further processing or analysis using machine learning techniques.
What is the size of an image tensor?
The size of an image tensor can vary depending on the image and the desired configuration. However, a commonly used size for an image tensor in deep learning applications is 3-dimensional, with dimensions corresponding to height, width, and channels. The height and width represent the pixel dimensions of the image, while the channels indicate the number of color channels in the image (e.g., 3 for RGB color images, and 1 for grayscale images). Thus, a typical image tensor might have dimensions like (height, width, channels) or (batch_size, height, width, channels), where batch_size refers to the number of images in a batch.
How to convert a tensor back to an image in Golang?
To convert a tensor back to an image in Golang, you can use the Gorgonia library.
Here's an example code snippet that demonstrates the process:
package main
import ( "fmt" "image" "image/color" "image/png" "log" "os"
"gorgonia.org/gorgonia"
"gorgonia.org/tensor"
)
func main() { // Assuming you have a tensor of shape [width, height, channels] t := tensor.New(tensor.WithShape(2, 2, 3), tensor.WithBacking([]float64{ 255, 0, 0, // Red 0, 255, 0, // Green 0, 0, 255, // Blue 255, 255, 0, // Yellow })).T()
// Create a new image with the same shape as the tensor
img := image.NewRGBA(image.Rect(0, 0, t.Shape()\[0\], t.Shape()\[1\]))

// Access the tensor data
data, err := t.Data()
if err != nil {
	log.Fatal(err)
}

// Iterate through the tensor data and set the pixel values of the image
for i := 0; i < t.Shape()\[0\]; i++ {
	for j := 0; j < t.Shape()\[1\]; j++ {
		r, g, b := normalizePixel(data\[i\*t.Shape()\[1\]\*t.Shape()\[2\]+j\*t.Shape()\[2\]\], // Red channel
			data\[i\*t.Shape()\[1\]\*t.Shape()\[2\]+j\*t.Shape()\[2\]+1\],                 // Green channel
			data\[i\*t.Shape()\[1\]\*t.Shape()\[2\]+j\*t.Shape()\[2\]+2\])                 // Blue channel
		img.Set(i, j, color.RGBA{uint8(r), uint8(g), uint8(b), 255})
	}
}

// Save the image to a file
file, err := os.Create("output.png")
if err != nil {
	log.Fatal(err)
}
defer file.Close()

if err := png.Encode(file, img); err != nil {
	log.Fatal(err)
}

fmt.Println("Image saved to output.png")
}
func normalizePixel(r, g, b interface{}) (float64, float64, float64) { return gorgonia.Tofloat(r), gorgonia.Tofloat(g), gorgonia.Tofloat(b) }
In this example, a tensor with shape [2, 2, 3] is created representing two pixels with three color channels (RGB). Each pixel is set to a color (red, green, blue, and yellow). The tensor data is then iterated over, and the pixel values are normalized and set in the image using the image.Set() function. Finally, the resulting image is saved to a PNG file named "output.png".
Make sure to import the necessary packages using go get command:
go get gorgonia.org/gorgonia go get gorgonia.org/tensor
Note: This example assumes you have Gorgonia and the necessary dependencies installed.
How to normalize an image tensor in Golang?
To normalize an image tensor in Golang, you can follow these steps:
- Load the image tensor: Start by loading the image tensor into your program. You can use popular image processing libraries such as "github.com/disintegration/imaging" or "github.com/nfnt/resize" to load the image and convert it into a tensor.
- Calculate the mean and standard deviation: Once you have the image tensor, calculate the mean and standard deviation values. Traverse through each pixel in the tensor and compute the sum of all pixel values to get the mean. Similarly, calculate the sum of squared differences from the mean to get the variance. Finally, calculate the square root of the variance to obtain the standard deviation.
- Normalize the tensor: Iterate through each pixel again and subtract the mean from each pixel value. Then, divide the result by the standard deviation to normalize the pixel values.
Here's an example code snippet demonstrating the normalization process:
package main
import ( "fmt" "math" "github.com/disintegration/imaging" "github.com/nfnt/resize" "github.com/tensorflow/tensorflow/tensorflow/go" )
func normalizeImageTensor(tensor *tf.Tensor) *tf.Tensor { shape := tensor.Shape() flattened := tensor.Value().([][][]float32) var sum, squaredSum float32 count := shape[1] * shape[2] * shape[3]
for \_, channel := range flattened {
    for \_, row := range channel {
        for \_, pixel := range row {
            sum += pixel
            squaredSum += pixel \* pixel
        }
    }
}

mean := sum / float32(count)
variance := squaredSum/float32(count) - mean\*mean
stdDeviation := float32(math.Sqrt(float64(variance)))

for \_, channel := range flattened {
    for \_, row := range channel {
        for i, pixel := range row {
            row\[i\] = (pixel - mean) / stdDeviation
        }
    }
}

normalizedTensor, \_ := tf.NewTensor(flattened)

return normalizedTensor
}
func main() { img, _ := imaging.Open("path/to/image.jpg") resized := resize.Resize(224, 224, img, resize.Lanczos3)
tensor, \_ := tf.NewTensor(resized.Pixels())
normalizedTensor := normalizeImageTensor(tensor)

fmt.Println(normalizedTensor) // normalized image tensor
// You can proceed with the normalized image tensor for further processing
}
Make sure to replace "path/to/image.jpg" with the actual path to your image file. Also, ensure you have the necessary image processing libraries installed.