
Best Drag-And-Drop Tools for Canvas to Buy in November 2025
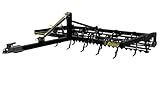
Carolina Firefly Arena Drag and Groomer - 5ft Wide for ATV's, UTV's, and Tractors - Easy Assembly
- STURDY STEEL DESIGN ENSURES DURABILITY FOR REGULAR USE.
- 5FT WIDTH COVERS MOST ATV AND SMALL TRACTOR TIRE TRACKS.
- PORTABLE AT ONLY 210LBS; EASY TO ATTACH TO VARIOUS HITCHES.


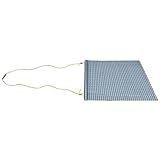
Yard Tuff Drag Mat, Lawn-Leveler & Baseball-Diamond Maintenance Rake, Manual Tow Rope Included, 3 Feet by 3 Feet
-
EFFORTLESSLY SMOOTH LARGE AREAS WITH OUR 3' X 3' DRAG MAT!
-
DURABLE STEEL-MESH DESIGN: MADE FOR ALL SEASONS AND CONDITIONS!
-
MANUAL PULL OPTION: NO GARDEN TRACTOR NEEDED FOR EASY USE!
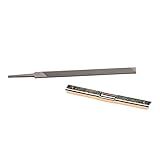
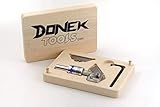
Oregon 40466 Chainsaw Depth Gauge Tool And Flat File
- ACCURATE .025 DEPTH GAUGE FOR PRECISE SETTINGS EVERY TIME!
- VERSATILE FLAT FILE WORKS WITH OR WITHOUT A HANDLE FOR CONVENIENCE.
- EASY-TO-FOLLOW INSTRUCTIONS FOR MASTERING FILING TECHNIQUES INCLUDED!
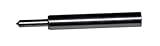
(NEW) RDZ ENGRAVER FOR CNC MACHINE. DIAMOND SPRING LOADED DRAG ENGRAVING TOOL WITH 90 DEGREE TIP
- VERSATILE ENGRAVING FOR BRASS, ALUMINUM, TROPHIES & NAME TAGS!
- PRECISION STAINLESS STEEL BODY ENSURES DURABLE, HIGH-QUALITY RESULTS.
- PROUDLY MADE IN THE USA BY A TRUSTED VETERAN-OWNED BUSINESS!
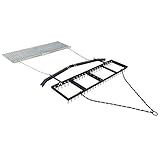
Yard Tuff 6 Foot Spike Drag with Surface Leveling Bar and Drag Mat for Yards, Baseball Diamonds Compatible with ATVs, UTVs and Utility Tractors, Black
- VERSATILE FOR DRIVEWAYS, YARDS, AND FOOD PLOTS; FITS ATVS, UTVS, TRACTORS.
- DURABLE STEEL MESH AND EXTRA WEIGHT ENHANCE PERFORMANCE AND RELIABILITY.
- RUST-RESISTANT WITH A DRAG MAT EXTENSION FOR SMOOTH, PRISTINE SURFACES.
Donek Tools D2 Drag Knife
- VERSATILE CUTTING: HANDLES VARIOUS MATERIALS WITH PRECISION.
- DEEP CUTS: ACHIEVE UP TO 1/4 IN. DEPTH FOR INTRICATE DESIGNS.
- FLEXIBLE RADIUS: CUT SHARP TURNS FOR DETAILED CREATIONS EFFORTLESSLY.
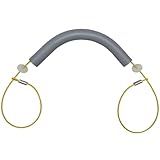
Hawk Cinch Deer Drag | Hunting Versatile Portable 9.5" Lightweight Compact No-Cutting Deer Cinch Gambrel | Works with Bucks & Does
- REDUCE DRAG BY 40%: EXPERIENCE EFFORTLESS TRANSPORT WITH LESS EFFORT.
- LIGHTWEIGHT & COMPACT: EASY TO CARRY AND STORE FOR ALL YOUR HUNTING TRIPS.
- VERSATILE & ERGONOMIC: FITS ALL GAME SIZES WITH COMFORTABLE HANDLING.
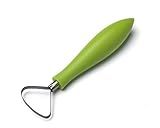
Xiem Studio Tools Teardrop Loop Trimming Tool (Medium)
- HEAT-TREATED STEEL ENSURES DURABILITY FOR LONG-LASTING USE.
- ERGONOMIC HANDLES PROVIDE COMFORT FOR EXTENDED CARVING SESSIONS.
- NEON COLORS MAKE TOOLS EASY TO SPOT AND FUN TO WORK WITH!
Mark Feldstein & Associates Drag Racing Christmas Tree Lighted Thermometer Sound Tabletop Alarm Clock
-
EXPERIENCE THRILLING WAKE-UPS WITH REALISTIC RACING SOUNDS AND LIGHTS.
-
UNIQUE DRAG RACING DESIGN ADDS EXCITEMENT TO ANY BEDROOM DECOR.
-
PERFECT GIFT FOR RACING FANS, ENSURING THEY ALWAYS RISE IN STYLE!
To implement drag-and-drop functionality on a canvas, you can follow these steps:
- Set up the Canvas: Start by creating a canvas element in your HTML file. Give it a unique identifier so that you can target it in your JavaScript code.
- Add Event Listeners: Use JavaScript to select the canvas element and attach event listeners for the necessary events: mousedown, mousemove, and mouseup. These events will handle the drag-and-drop functionality.
- Track Mouse Coordinates: Inside the mousedown event listener, record the initial position of the mouse cursor by accessing the clientX and clientY properties of the event parameter. Store these values in variables.
- Update Mouse Coordinates: In the mousemove event listener, calculate the difference between the current mouse position and the initial position. You can do this by subtracting the stored initial position values from the clientX and clientY properties of the event. Store these difference values in variables.
- Move the Object: To create the dragging effect, access the object you want to drag on the canvas and update its position. Use the stored difference values from step 4 and add them to the object's current position. This can often be achieved by manipulating the CSS top and left properties.
- Stop Dragging: Inside the mouseup event listener, stop tracking the mouse coordinates and perform any necessary cleanup or final positioning of the dragged object.
By implementing these steps, you can achieve drag-and-drop functionality on a canvas element. Remember to customize the code according to your specific needs and the structure of your application.
How to enable touch-based drag-and-drop on a canvas?
To enable touch-based drag-and-drop on a canvas, you can follow these steps:
- Create a canvas element in your HTML. Give it an id to easily access it using JavaScript.
- Attach touch event listeners to the canvas element in your JavaScript code.
const canvas = document.getElementById('myCanvas'); canvas.addEventListener('touchstart', handleTouchStart, false); canvas.addEventListener('touchmove', handleTouchMove, false); canvas.addEventListener('touchend', handleTouchEnd, false);
- Implement the touch event handler functions to track the movement of the touch gesture.
let touchStartX, touchStartY, touchEndX, touchEndY;
function handleTouchStart(event) { touchStartX = event.touches[0].clientX; touchStartY = event.touches[0].clientY; }
function handleTouchMove(event) { event.preventDefault(); // Prevent scrolling while dragging
// Calculate the difference in touch position from the start touchEndX = event.touches[0].clientX - touchStartX; touchEndY = event.touches[0].clientY - touchStartY;
// Update the position of the dragged object on the canvas // Here, you may need to have an object or element on the canvas to drag // You can update its position using the calculated touch difference }
function handleTouchEnd(event) { // Reset the touch positions touchStartX = null; touchStartY = null; touchEndX = null; touchEndY = null; }
- Inside the handleTouchMove function, you can update the position of the dragged object on the canvas. You may have an object stored in a variable or draw it on the canvas using the canvas context (getContext('2d')). Use the touchEndX and touchEndY values calculated in the touch move events to update the object's position.
// Example update function for a draggable object function updateObjectPosition(x, y) { // Assuming the object's position is stored in variables objectX += x; // Update the X-coordinate objectY += y; // Update the Y-coordinate
// Redraw the object with the updated position on the canvas // You can use the 2D canvas context and relevant methods/functions for drawing // For example, if you have a rectangle object, you can use context.fillRect() // If you have a custom drawn object, you can use context.clearRect() and other relevant functions }
Remember to modify the code based on your specific use case, as this is just a basic outline for enabling touch-based drag-and-drop on a canvas.
What is the difference between drag and drop events?
Drag and drop events refer to the interaction of moving an object from one location to another using a pointing device such as a mouse. The main difference between drag and drop events lies in their execution and purpose:
- Drag Events: A drag event occurs when a user presses and holds the mouse button on an element and then moves it. It involves three primary events: dragstart: Fired when the user initiates the dragging of an element. drag: Fired continuously as the user moves the dragged element. dragend: Fired when the user completes the drag operation, either by releasing the mouse button or by canceling the drag. Drag events are responsible for tracking the movement of the dragged object and updating its position accordingly. They are commonly used to enable actions like reordering items or transferring data from one place to another.
- Drop Events: A drop event occurs when the dragged object is released onto a target element. It involves several events: dragenter: Fired when the dragged object enters the drop target. dragover: Fired continuously as long as the dragged object is over the drop target. dragleave: Fired when the dragged object leaves the drop target. drop: Fired when the dragged object is released onto the drop target. Drop events are responsible for handling the action performed when the object is dropped onto a specific location. For instance, it could involve accepting the dropped data, triggering a specific function, or updating the UI accordingly.
In summary, drag events deal with the movement of the object being dragged, whereas drop events handle the action performed when the object is released onto a target element.
How to create custom cursors for drag-and-drop on a canvas?
To create custom cursors for drag-and-drop on a canvas, you can follow these steps:
- Prepare the images for the cursors: Create two images, one for the cursor when dragging is allowed, and another for when dragging is not allowed. These images should be in a format that supports transparency, such as PNG.
- Define the CSS cursor styles: In your CSS file, define two custom cursor styles using the url() function to refer to the images you prepared. For example:
.canvas-drag-allowed { cursor: url(allowed-cursor.png), auto; }
.canvas-drag-not-allowed { cursor: url(not-allowed-cursor.png), auto; }
- Capture the drag events: In your JavaScript code, capture the relevant drag events (such as dragenter, dragover, dragleave, dragstart, and dragend) on your canvas element using event listeners.
- Set the cursor style dynamically: Based on the allowed or not allowed conditions of the drag, dynamically set the cursor style of the canvas element using JavaScript. For example:
var canvas = document.getElementById("my-canvas");
canvas.addEventListener("dragenter", function(event) { // Check if dragging is allowed if (event.dataTransfer.effectAllowed === "move") { // Set custom cursor for allowed dragging canvas.style.cursor = "url(allowed-cursor.png), auto"; } else { // Set custom cursor for not allowed dragging canvas.style.cursor = "url(not-allowed-cursor.png), auto"; } });
canvas.addEventListener("dragleave", function(event) { // Reset to default cursor when drag leaves canvas canvas.style.cursor = "default"; });
// Repeat similar code for other drag events
Note: Make sure to replace "my-canvas" with the actual ID of your canvas element. Also, adjust the conditions based on your specific drag-and-drop logic.
By following these steps, you can create custom cursors for drag-and-drop interactions on a canvas.
What are some popular JavaScript libraries for drag-and-drop on a canvas?
Some popular JavaScript libraries for drag-and-drop on a canvas are:
- Konva.js: A 2D drawing library that provides an intuitive and easy-to-use API for adding drag-and-drop functionality to canvas elements.
- Fabric.js: A powerful and flexible JavaScript library for working with HTML5 canvas. It includes built-in support for drag-and-drop interactions.
- D3.js: Although primarily known for its data visualization capabilities, D3.js also provides drag-and-drop functionality for working with SVG and canvas elements.
- interact.js: A lightweight JavaScript library that enables drag-and-drop, resizing, and gesture recognition on both desktop and mobile devices.
- Draggabilly: A small and standalone JavaScript library for creating draggable elements. While not limited to canvas elements, it can be easily used to enable drag-and-drop functionality within a canvas.
- SortableJS: Although designed for creating sortable lists and grids, SortableJS can also be used to implement drag-and-drop functionality on canvas elements.
These libraries offer varying levels of functionality, so you may choose the one that best fits your project requirements and coding style.